Tutorial with example data
DriverPower aims to identify cancer driver candidates from somatic variants of a tumour cohort. The minimal number of samples required in the PCAWG study is 15. However, more samples will have more power to detect rare driver events. Both whole-genome sequencing and panel sequencing variants can be used.
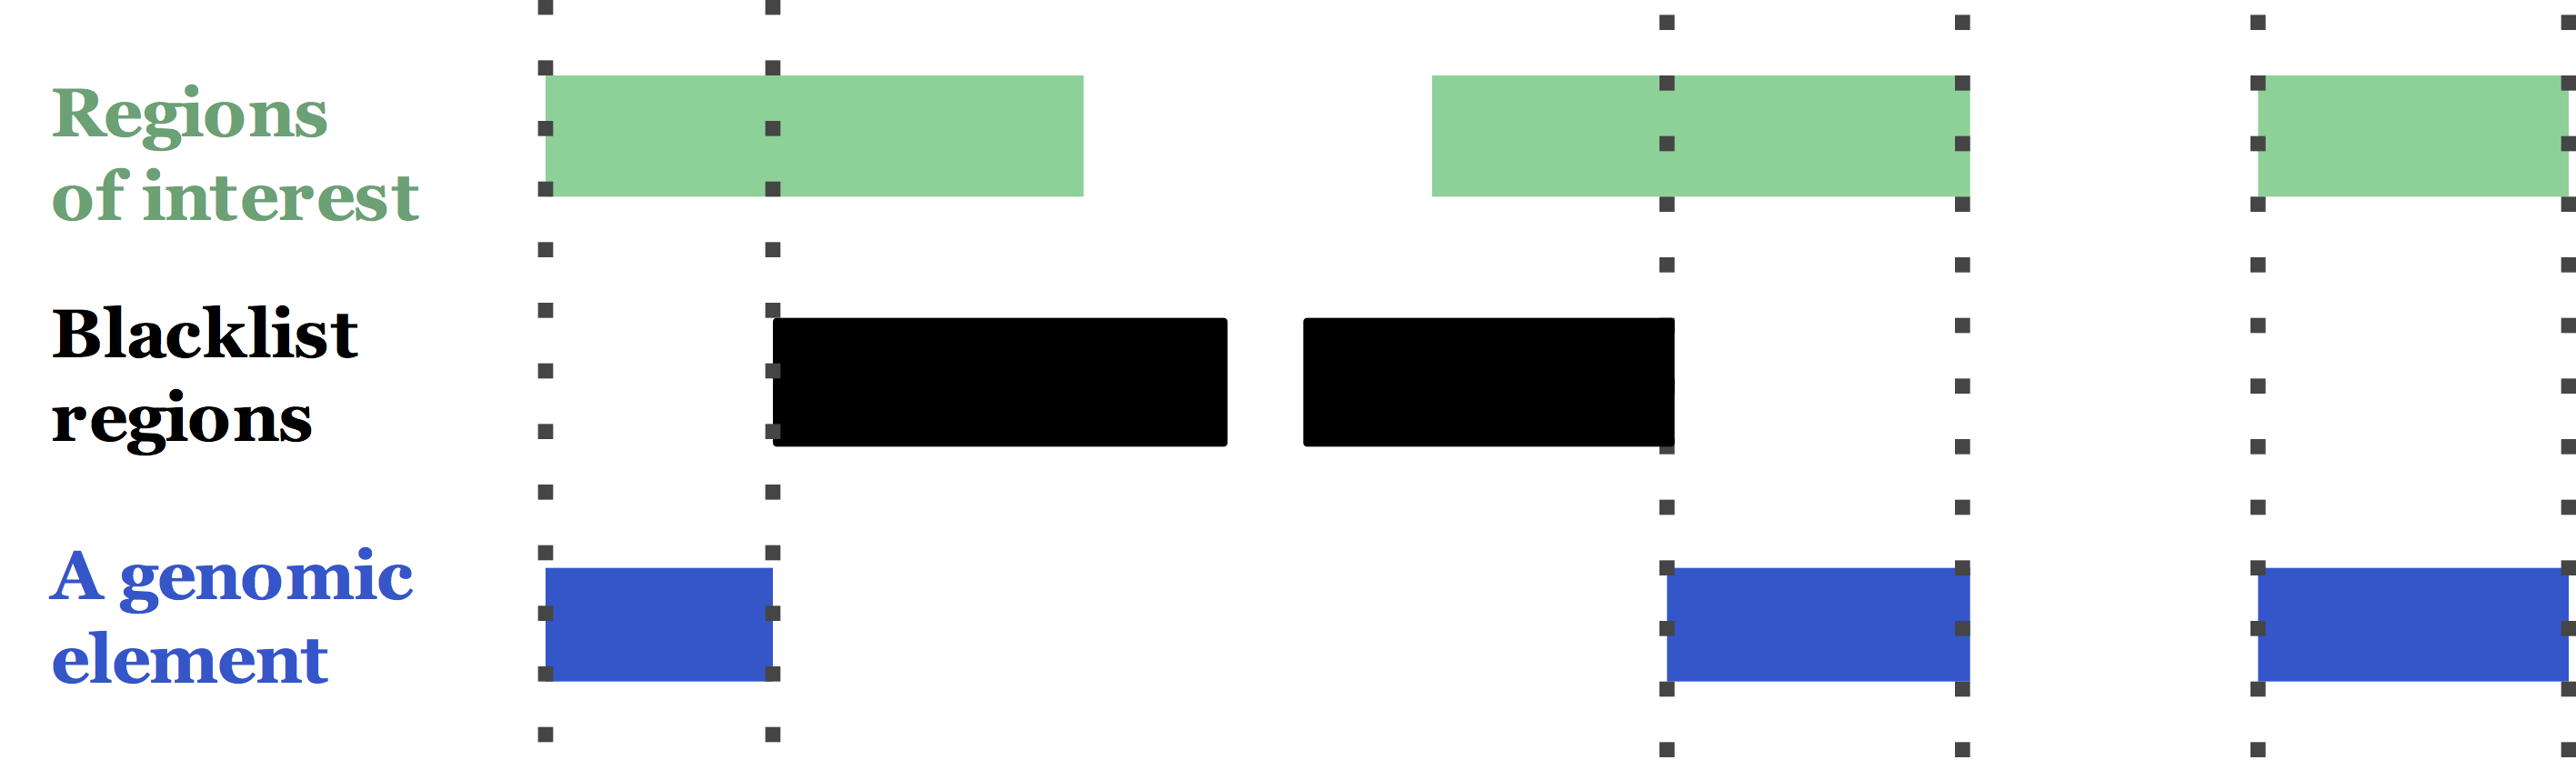
The basic test unit accepted by DriverPower is called a genomic element, which is a set of disjoint (or continuous) genomic regions (see the figure below). In our manuscript, we also removed all blacklist regions to reduce the effect of variant artifacts. In the real world, a genomic element can be all exons of a gene, or all TF binding sites among a promoter etc.
Typically 1K to 100K genomic elements are tested together such as ~20K genes in the human genome. For each element, given its functional impact, mutational burden as well as thousands of features, DriverPower will report a p-value and q-value associated with that element.
0: Download example data
Our example data are hosted on figshare, on which you can find the following files:
- random_mutations.tsv.gz [14 MB]: randomized whole-genome somatic mutations from 50 patients.
- train_feature.hdf5.part1 [4 GB]
- train_feature.hdf5.part2 [4 GB]
- train_feature.hdf5.part3 [900 MB]
- test_feature.hdf5 [1.4 GB]
- train_elements.tsv.gz [7 MB]
- test_elements.bed12.gz [6 MB]
- callable.bed.gz [5 MB]: whitelisted genomic regions used in DriverPower; can be substituted with a chromosome length file (BED format) to use the entire genome.
Important
You can run DriverPower for your own data by simply replacing random_mutations.tsv.gz with your mutations.
The training features has been divided into three parts, so you will need to merge them:
cat train_feature.hdf5.part1 train_feature.hdf5.part2 train_feature.hdf5.part3 > train_feature.hdf5
md5sum train_feature.hdf5  # should be cb4af6bc7979efa087955f94909dd065
1: Install Python and DriverPower
For this tutorial, we used a brand new virtual machine with 15 CPUs and 125GB RAM. The OS we used is Ubuntu 18.04.1 LTS (GNU/Linux 4.15.0-33-generic x86_64).
To install Python3 using Anaconda3 if you don’t already have:
# Find the current version from Anaconda (https://repo.anaconda.com/archive/)
wget https://repo.anaconda.com/archive/Anaconda3-[version]-Linux-x86_64.sh
# You may need sudo to run this
./Anaconda3-[version]-Linux-x86_64.sh
. .bashrc
It’s always better to create a new conda environment, so that all your existing packages won’t get messed up:
# [Optional] Create a new environment for DriverPower
conda create --name driverpower
# [Optional] Activate the environment
conda activate driverpower
Then we can install required packages and DriverPower:
# Setup Bioconda Channels if not set before
# https://bioconda.github.io/user/install.html#set-up-channels
conda config --add channels defaults
conda config --add channels bioconda
conda config --add channels conda-forge
# Install DriverPower
conda install -c smshuai driverpower
2: Make response tables
The response (y; dependent variable) table records the observed number of mutations, number of mutated samples and the length per genomic element.
This table is required for both model (training) and infer (test) sub-commands.
You can make them easily using our helper script prepare.py. Inputs will be mutations and elements:
# Get the helper
wget https://raw.githubusercontent.com/smshuai/DriverPower/master/script/prepare.py
# Training responses
python ./prepare.py random_mutations.tsv.gz train_elements.tsv.gz callable.bed.gz train_y.tsv
# Test responses
bedtools bed12tobed6 -i ./test_elements.bed12.gz  | cut -f1-4 > test_elements.tsv
python ./prepare.py random_mutations.tsv.gz test_elements.tsv callable.bed.gz test_y.tsv
3: Build the background mutation rate model
The background mutation rate (BMR) model is used to estimate the expected number of somatic mutations for each genomic element,
given its features. DriverPower sub-command model is used to train BMR models. To build the BMR model, training features
(X) and responses (y) are required. DriverPower supports two algorithms for the BMR model, generalized linear models (GLM)
and gradient boosting machines (GBM).
Here we show how to build a GBM with our example data:
mkdir output
driverpower model \
    --feature train_feature.hdf5 \
    --response train_y.tsv \
    --method GBM \
    --name tutorial \
    --modelDir ./output
You should see the following log info (taking ~3 hours on our VM):
09/08/2018 20:42:37 | INFO: Welcome to DriverPower v1.0.1
09/08/2018 20:42:59 | INFO: Successfully load 1373 features for 867266 bins
09/08/2018 20:43:05 | INFO: Use 867266 bins in model training
09/08/2018 20:43:14 | INFO: Split data fold 1/3
09/08/2018 20:43:19 | INFO: Split data fold 2/3
09/08/2018 20:43:25 | INFO: Split data fold 3/3
09/08/2018 20:43:31 | INFO: Training GBM fold 1/3
[0]     eval-poisson-nloglik:114024
Will train until eval-poisson-nloglik hasn't improved in 5 rounds.
[100]   eval-poisson-nloglik:25279.4
.......omit many lines.............
Stopping. Best iteration:
[1128]  eval-poisson-nloglik:1.38992

09/08/2018 23:56:35 | INFO: Model metrics for training set: r2=0.63, Variance explained=0.63, Pearson'r=0.79
09/08/2018 23:56:42 | INFO: Job done!
4: Infer driver candidates
DriverPower can be used to find driver candidates with or without
functional information. This step will use the model file ./output/tutorial.GBM.model.pkl
from last step.
We first show how to call driver candidates without functional information, aka, burden-test only:
driverpower infer \
    --feature test_feature.hdf5 \
    --response test_y.tsv \
    --model ./output/tutorial.GBM.model.pkl \
    --name 'DriverPower_burden' \
    --outDir ./output/
To use functional information, one or more types of functional measurements (e.g., CADD, EIGEN, LINSIGHT etc)
need to be collected first. The CADD scores can be retrieved via its
web interface (up tp 100K variants each time) without downloading the
large file for all possible SNVs (~80 G). If you have more than 100K variants, you can either split your file and run
the web app multiple times, or download the large file and try tabix.
Other scores can be obtained using a similar method after download.
After obtaining the per-mutation score, you can calculate the average score per element, which will be used by DriverPower.
Here we show how to score 1,000 mutations and calculate per-element score:
# We omit INDELs here; but CADD can score INDELs in VCF format
zcat ./random_mutations.tsv.gz | \
awk 'BEGIN{OFS="\t"} $4 != "-" && $5 != "-" {print $1,$3,".",$4,$5}' | \
head -1000 | gzip > random_mutations.1K.vcf.gz
# Upload formatted variants (random_mutations.1K.vcf.gz) to CADD's web interface
# and download the result file (something like GRCh37-v1.4_f8600bd0c0aa23d4f6abc99eb8201222.tsv.gz).
#####
# Intersect the score file (we use the PHRED score) with test elements
zcat ./GRCh37-v1.4_f8600bd0c0aa23d4f6abc99eb8201222.tsv.gz | \
tail -n +3 | awk 'BEGIN {OFS="\t"} {print "chr"$1, $2-1, $2, $6}' | \
bedtools intersect -a ./test_elements.tsv -b stdin -wa -wb > CADD_ele.tsv
# The 4th column is the element ID and the 8th column is the CADD PHRED score
printf "binID\tCADD\n" > CADD_per_ele_score.tsv
bedtools groupby -i ./CADD_ele.tsv -g 4 -c 8 -o mean  >> CADD_per_ele_score.tsv
We can now supply the per-element score file to DriverPower and call driver candidates:
driverpower infer \
    --feature test_feature.hdf5 \
    --response test_y.tsv \
    --model ./output/tutorial.GBM.model.pkl \
    --name 'DriverPower_burden_function' \
    --outDir ./output/ \
    --funcScore CADD_per_ele_score.tsv \
    --funcScoreCut "CADD:0.01"
5: Misc.
TODO